DIYPhotobits.com Camera Control 2.0 : Embarrassment

Update, try the

Camera Control 2.1 instead which fixes some bugs.

Ok so here is DIYPhotobits.com Camera Control 2.0 — the Embarrassment release.   I’ve named it that because I’ve had no time to work on it recently and so it still is a) very rough with major holes and b) fails to have all the obvious fixes and enhancements that I have discussed with people.

DOWNLOAD

– Try instead 2.1 which fixes some bugs

So why release it at all?  Well because having control of the camera exposure from the computer is cool — and at the moment I have it sitting here on my PC working and maybe you’d like to have it on your PC working as well.

New features:

  • Control exposure mode (M/S/A/P) – Tested D300 works, D40 does not (because that setting is a physical dial on the D40 and software can’t override it)
  • Control Shutter speed, Aperture, ISO, WB and Exposure Compensation from the PC – Tested  D300 and D40 work
  • Shows battery status while in tethered mode – Tested D300 works


New known bugs, issues and uglinesses

  • Exposure Compensation drop down makes no sense — 0 means 0 but the others are internal codes, you’ll see what they mean after a few moments though, each one is a third stop plus or minus.
  • Not all the exposure setting drop downs default to sensible values, e.g. the current camera settings.
  • Also read this bug list
Old known bugs, issues and uglinesses
  • doesn’t save the download target folder name between sessions — should be an easy fix
  • doesn’t download RAW on *some* Vista machines — a mystery
  • finds files exist and complains on each tethered download for some machines — another mystery
  • refuses to believe some cameras can take pictures — needs investigation, but perhaps I can just have it ignore this or make it a warning instead of fatal
  • crashes if the camera can’t focus — I know how to fix this
  • looses camera if cable is unplugged, even if it is plugged in again — I think I have a solution to that but it is clumsy, not sure if it will really work
Features I keep talking about but still haven’t done
  • Time lapse / intervalometer

Troubleshooting WIA connections

I can’t tell why it is that the Camera Control script doesn’t work for some systems, but I presume it is some difference in the WIA configuration or settings of that camera or PC.  If you’d like me to try to fix it for your system then I’ll need some more details.

Use this WIA test program, from http://www.milika.net/, to get the details of your WIA connection and send them to me.  You can leave them as a comment here or email them to me at raymond -at- this domain name (diyphotobits.com).

Thanks.

ps. note that it is a RAR, not a ZIP.

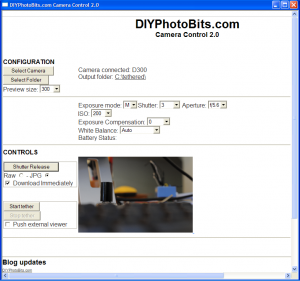
A peek at where I’m up to with Camera Control

This still isn’t finished but I’m quite happy that I’ve got so far all ready…

Camera Control 2 in development

Camera Control 2 in development

Now I can control from the PC which exposure mode the camera is in (M, P, A, S) — but only on the D300, I suppose sensibly it is impossible to control that on the D40 where it is set by a physical dial.

But presuming the mode allows it I can then control aperture and shutter speed easily.  ISO, and WB are easy to set — but I can’t tell what the initial settings of the camera are when it is plugged in which is a bit annoying.

Still have some work to do on the Exposure Compensation control as well.  And generally on the layout of the controls to make them fit together in some sort of sensible way.

But look out soon for this new version — and let me know what other controls or info you’d like to see in here.


DIYPhotobits.com Camera Control 1.0

Update; Now try version 2.

Ok here’s something new — I’ve taken the various little scripts for tethered shooting and remote control and wrapped them up in a nicer interface.  This is the first time I’ve tried writing a “hypertext application” or .HTA file and it’s quite an interesting mix of HTML and scripting.  I think I can do quite a few interesting things with this.  But for now here I have produced:

DIYPhotobits.com Camera Control 1.0

DOWNLOAD (200K installer)

 Use version 2 instead

As I have wrapped up the script in a nice interface I thought I should fix up the download and install process as well.  So it now has a real installer which makes a Start menu icon, installs and registered the Microsoft DLL, and it can be uninstalled via the Control Panel Add/Remove Program icon.

So if you are not happy about download and running text file scripts or installing DLLs yourself then this is the version for you.  I’ve tried to “degeek” it as much as I can!


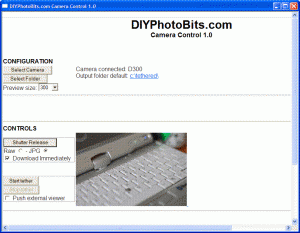
Screen shot of Camera Control 1.0

I haven’t added a lot of new features, this is more of a combination of existing stuff but you will notice:

  • It automatically detects your camera if you have only one installed, it only asks you to select if you have more than one.  And it isn’t confused by scanners any more, it knows those are not cameras.
  • You can choose the output folder to save the files with a click of a button.
  • There is a preview window that shows the image you just shot.  Size is adjustable.  JPG only for now, but if you shoot RAW + JPG then both download and the JPG is displayed.

Existing features maintained include:

  • Choose Raw or JPG when triggering remote shutter
  • Download (optionally) when remotely releasing shutter – if you do then it becomes the “Self Portrait Script”
  • Tethered mode where all images shot using either the PC button or the camera shutter release button are immediately downloaded.  Takes about 7 seconds from pressing shutter release to viewing it full size in Bridge.
  • Pushes external veiwers, including Adobe Bridge CS3 and Windows Explorer, to the next image.
As always comments and suggestions are welcome!   Now that I have a nice solid foundation for this I can go and add some new features that might be fun, so get your suggestions in now.

Free Tethered Shooting for Linux

This is not mine and I haven’t tried it but I appreciate the nice simple approach, perhaps because it is like mine, of a script wrapper around some standard functionality.

See this post where appollux explains the scripting necessary to get tethered shooting working on Linux, or probably any similiar *nix system.

It really makes me want to go ahead and implement some more interesting features now that the basics are taken care of for most people.  But first I really have to do that bamboo monopole — I suffer from terrible handshake it seems.

Stereoscopic Time laps Movies

Just saw this great time laps video, via Chase

via Savan, via Gizmodo , which gives me an idea as to what one would actually use an intervalometer for.  So I’m one step closer to writing that intervalometer script I’ve been meaning to do.  I mean really it is just remote shutter release on a timer, though one could spice it up with tethered downloading and maybe deletion from camera to prevent a small memory card from limiting the idea.  battery power is still going to be a limit though — A/C adaptors are available I know but never seen anybody who had one.  

But then I just read this blog post where he mentions “four Getty photographers would all be shooting tethered into 2 editor’s computers ” – I don’t really know what he meant by that but I read it as more than one camera connected to the same computer.  

Not a problem!  I presume I can do that — two WIA device instances — but then what do I do with two cameras shooting at (nearly) the same time?  Well just let all those wicked flavours (as Jamie Oliver likes to say) do their thing — and mix all the ideas together and out pops..

Stereoscopic Time laps Movies!

If I rig up two cameras with suitable distance appart — a bit more than true eye distance is necessary due to the size of the cameras and probably desirable to exagerate the 3D effect — then shoot them simultaneously while looking at a scene at regular intervals.  And tada!  My own 3D movies.

But.. But… how to display them?  Can I show stereo onscreen?  Blue/red glasses?  ug no!  How about that trick where you basically go the reverse of cross-eyed while staring at something.  It sometimes works but does give you eye strain after a while.  Perhaps I need to find some lenses and make a real viewer.  

This one gets filed under Ideas (e.g. not actually done yet), but maybe one day!

You know what a Justin Clamp is, right?

If you follow any of the small light shooters or “strobism” in general as I do then you’ll have come across the “Justin Clamp” quite a few times in passing.  If not, then lets just say it is an ugly beast that provides several useful ways to attach something to something else — typically a hotshoe flash to a pole, shelf, tripod leg or probably someone’s nose if they stay still long enough.

Supposedly it was invented by Justin Stailey (formerly of Bogen, now of Leica USA per Drew Gardner)  to satisfy the need of one particular photographer, but anyone can buy one if you are prepared to part with the cash.

It comes with a cold shoe but it may be a bit tight for the SB-900, but works fine with an SB-800.  Now I haven’t got a 900 but presume that like a SB800 it comes with it’s own cold foot or stand – the AS-19 which is a often ignored but very useful piece of kit.

This gives me a simple option to DIY a replacement for a Justin Clamp, for cheap.  A Bulldog clip from a stationary store, bolt and a couple of nuts and I have this.

Shown here clamping onto a bookcase with flannel to get a good grip without scratching the wood.

And if you are wondering why I don’t use those big clamps with the green or orange rubber tips, it’s because I can’t find any place that sells them around here!

Finally, if you want a real Justin Clamp – which is better but more expensive than a DIY version then you can always buy one from B&H. They are $56.95 but like any Bogen stuff will probably last your whole lifetime!